As a manufacturer specializing in PVC and uPVC window systems, I’ve spent years fielding one question more than any other from homeowners, renters, and contractors alike: can you hang blinds on vinyl windows without causing damage or voiding warranties? The short answer is yes, absolutely. But the long answer involves understanding your window frame material, choosing the right mounting method, and avoiding common mistakes that could cost you time and money.
Vinyl windows have become the dominant choice in modern construction for good reason. They offer superior insulation, resistance to moisture, and virtually zero maintenance compared to wood or aluminum frames. However, their hollow construction and thermal expansion properties mean traditional drilling methods can compromise structural integrity and manufacturer warranties. This guide draws directly from our engineering team’s specifications and years of field testing to give you the definitive answer.
Understanding Vinyl Window Frames and Their Limitations
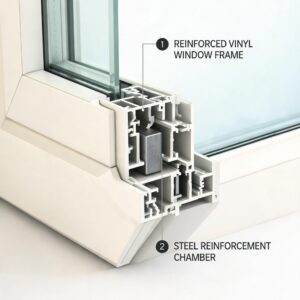
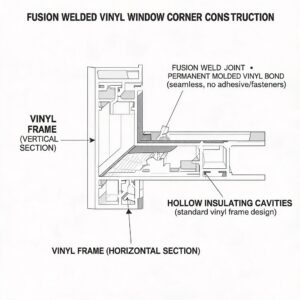
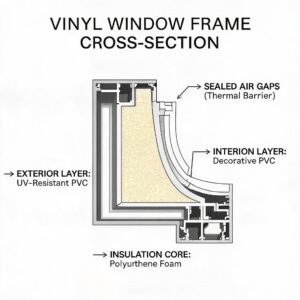
Before we dive into installation methods, it’s essential to understand what makes vinyl windows different. Unlike wood frames that can be drilled into repeatedly, vinyl windows use extruded PVC profiles that are often hollow or filled with insulation. The outer surface is a thin skin that provides aesthetic appeal and weather resistance, but it lacks the depth for secure screw anchoring in most cases.

When you drill into a vinyl frame, you risk creating stress points that can lead to cracking, especially during temperature fluctuations. Vinyl expands and contracts significantly with heat and cold, and a drilled hole can become a focal point for stress fractures. Additionally, most vinyl window warranties explicitly state that drilling into the frame voids coverage. This isn’t a marketing gimmick—it’s a structural reality.
The good news is that modern blind manufacturers and hardware engineers have developed multiple no-drill solutions that are not only effective but often more secure than traditional mounting methods. Let’s explore each option in detail.
The Four Proven No-Drill Methods for Hanging Blinds on Vinyl Windows
Tension Rod Systems: The Rental-Friendly Champion
Tension rod blinds represent the most popular solution for renters and homeowners who want zero permanent modifications. These systems work by using spring-loaded tension that presses against the inside of your window frame, holding the blind securely in place without any hardware.
How tension rods actually work: The rod contains an internal spring mechanism that compresses when you twist the rod to a shorter length. When placed inside the window frame and released, the spring pushes outward against both sides, creating friction that supports the weight of lightweight blinds. This is the same principle used in shower curtain rods, but engineered specifically for window applications.
Weight considerations: Standard tension rods support between 5 and 15 pounds depending on their diameter and construction. For reference, most cellular shades weigh less than 3 pounds, making tension rods an excellent match. However, wooden blinds or heavy roller shades may exceed this capacity.
Installation tips from our factory floor:
- Measure the exact inside width of your window frame at the top, middle, and bottom. Frames are rarely perfectly square
- Choose a tension rod that is slightly longer than your widest measurement
- Clean the contact points with rubbing alcohol to ensure maximum grip
- Test the tension before hanging your blinds by giving the rod a firm tug
Best blind types for tension rods: Lightweight cellular shades, sheer curtains, bamboo shades, and mini blinds work exceptionally well. Avoid heavy wooden blinds or layered fabric treatments.
Magnetic Bracket Systems: The Hidden Gem
Magnetic mounting is perhaps the most underutilized method for hanging blinds on vinyl windows, and it’s one we recommend frequently to our customers. The concept is simple: strong neodymium magnets attach to metal plates that you place on the window frame, creating a secure hold without any drilling.
The science behind magnetic mounts: Modern magnetic brackets use rare earth magnets that can hold 10 to 30 pounds per pair. The magnets are encased in rubber or plastic housings to prevent scratching. The corresponding metal plates are thin enough to be virtually invisible once installed.
Installation process:
- Clean the window frame surface thoroughly
- Apply the metal plates using high-bond adhesive tape (included with quality kits)
- Allow the adhesive to cure for 24 hours for maximum strength
- Attach the magnetic brackets to the metal plates
- Hang your blinds on the brackets
Where magnetic systems excel: They work brilliantly on windows with metal-reinforced frames, which many modern vinyl windows include for structural stability. If your window frame has metal components, you may not even need the adhesive plates—the magnets can attach directly to the frame itself.
Limitations to consider: Magnetic systems require a flat mounting surface. If your window frame has decorative contours or deep grooves, the metal plates may not adhere properly. Additionally, very heavy blinds may require multiple magnetic bracket pairs.
Adhesive Mounting Brackets: The Permanent Temporary Solution
Adhesive mounting has evolved significantly in recent years. Gone are the days of sticky residue and failed bonds. Modern adhesive brackets use industrial-grade VHB (Very High Bond) tape developed by companies like 3M, originally designed for automotive and aerospace applications.
What makes modern adhesive mounts different: These brackets use acrylic foam tape that creates a chemical bond with the surface over time. Unlike simple double-sided tape, VHB tape actually flows into microscopic imperfections in the vinyl surface, creating a mechanical lock that can support surprising weight.
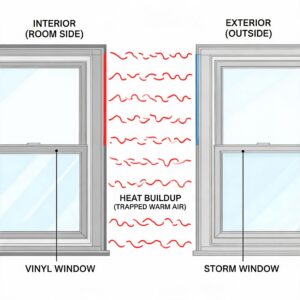
Weight capacity and limitations: Quality adhesive brackets can support 5 to 10 pounds per pair when properly installed. However, heat and humidity can reduce bond strength. We recommend avoiding adhesive mounts for south-facing windows that receive direct afternoon sun, as the vinyl surface can reach temperatures that soften the adhesive.
Installation best practices:
- Install when temperatures are between 60-80°F (15-27°C)
- Clean the surface with isopropyl alcohol and allow to dry completely
- Apply firm pressure for 30-60 seconds after placing the bracket
- Wait 24-48 hours before hanging blinds to allow the bond to cure
- Avoid installing on recently painted or sealed surfaces
Removal without damage: If you need to remove adhesive brackets, use a hair dryer or heat gun on low setting to warm the adhesive. This softens the bond, allowing you to gently pry the bracket away. Any residue can be removed with rubbing alcohol or citrus-based adhesive removers.
Clip-On and Snap-On Systems: The Specialty Solution
Some blind manufacturers offer clip-on systems designed specifically for vinyl windows. These systems use brackets that snap onto the top edge of the window frame or clip into the gap between the window sash and the frame.
How clip-on systems work: These brackets are shaped to hook over the top of the window frame or fit into the recess where the window sash meets the frame. They require no adhesive, no magnets, and no tension. The weight of the blind itself holds the brackets in place.
Best applications: Clip-on systems work best for inside-mount installations where the window frame has a defined lip or ledge. They are particularly effective for cellular shades and Roman shades that have a rigid headrail.
Installation considerations:
- Measure the depth of your window frame to ensure the clips fit
- Check that the clips don’t interfere with window operation
- Test that the blind can be removed easily for cleaning or adjustment
Step-by-Step Installation Guide for Tension Rod Blinds on Vinyl Windows
Let me walk you through the most common and reliable method for hanging blinds on vinyl windows without drilling. This process applies to tension rod systems, but many principles transfer to other methods.
Tools you’ll need:
- Tape measure
- Pencil for marking
- Level (optional but recommended)
- Rubbing alcohol and clean cloth
- Step stool or ladder
Step 1: Measure your window accurately
Measure the width of your window opening at three points: top, middle, and bottom. Use the narrowest measurement as your guide. For tension rods, you want the rod to be slightly longer than this measurement so it creates adequate pressure.
Step 2: Select the right tension rod
Choose a rod that is rated for your blind weight. Most tension rods have adjustable length ranges printed on the packaging. Ensure your window width falls within this range.
Step 3: Clean the contact surfaces
Wipe down the areas where the tension rod ends will contact the window frame. Even a thin layer of dust can reduce friction and cause the rod to slip.
Step 4: Adjust the rod length
Twist the tension rod to its shortest setting, then extend it until it fits snugly between the window frame sides. You want enough tension that the rod stays in place when you let go, but not so much that it bows or strains the frame.
Step 5: Install the blind
If your blind has a separate headrail, attach it to the tension rod according to the manufacturer’s instructions. For blinds with integrated rods, simply hang the blind and adjust the tension as needed.
Step 6: Test and adjust
Gently tug on the installed blind to ensure it’s secure. Open and close the window to verify the blind doesn’t interfere with operation. Make small adjustments to the tension rod length if needed.
Beyond Vinyl: Adapting These Methods for Other Window Materials
The methods we’ve discussed work exceptionally well on vinyl windows, but they’re equally effective on other frame materials. If you’re considering tension rod blinds for vinyl windows, you’ll be pleased to know these same techniques apply to wood, aluminum, and composite frames with minor adjustments.
For wood frames, adhesive mounts bond exceptionally well because the porous surface creates a strong mechanical grip. For aluminum frames, magnetic systems are ideal since the metal itself provides the magnetic attraction. Composite frames behave similarly to vinyl and respond well to all four methods.
Common Problems and How to Solve Them
Even with the best preparation, you may encounter issues. Here are the most common problems we see and their solutions:
Problem: The tension rod keeps slipping
Solution: Clean the contact points more thoroughly. If the surface is particularly smooth, apply a thin strip of rubber shelf liner to the rod ends for extra grip.
Problem: Adhesive brackets won’t stay attached
Solution: You may have installed in temperatures that are too cold or too hot. Remove the brackets, clean the surface, and reinstall when conditions are optimal. Consider switching to magnetic brackets if the problem persists.
Problem: The blind doesn’t hang level
Solution: Use a level during installation. If your window frame isn’t perfectly square (most aren’t), you may need to adjust the bracket positions or use shims to level the blind.
Problem: The blind interferes with window operation
Solution: Ensure you’re using an inside mount that doesn’t protrude beyond the window frame. For casement windows, consider outside-mount options that attach to the wall above the window.
When Drilling Is Actually Acceptable
While this guide focuses on no-drill methods, there are situations where drilling is acceptable and even recommended. If you own your home and your vinyl windows are out of warranty, or if you’re installing heavy blinds that exceed the capacity of no-drill methods, drilling into the wall above the window (not the window frame itself) is perfectly fine.
The key distinction is drilling into the wall framing versus drilling into the vinyl window frame. Wall framing can support significant weight and is easily repaired. The vinyl window frame, however, should remain untouched to preserve its structural integrity and weatherproofing.
For those who need to drill, we recommend using plastic wall anchors designed for hollow wall applications. These provide secure mounting without damaging the surrounding structure.
Product Recommendations Based on Window Type
Not all no-drill methods work equally well on all window styles. Here’s our recommendation matrix based on years of testing:
Double-hung windows: Tension rods work best because the vertical frame sides provide excellent contact surfaces. Magnetic brackets are also effective if the frame has metal reinforcement.
Casement windows: Adhesive brackets mounted on the top frame surface work well. Tension rods can interfere with the crank mechanism.
Sliding windows: Magnetic brackets are ideal because they can be positioned anywhere along the frame. Tension rods may not work if the sliding track creates uneven surfaces.
Bay windows: A combination of tension rods and adhesive brackets often works best, as bay windows typically have deep frames that accommodate multiple mounting options.
The Manufacturer’s Perspective on Warranty and Longevity
As a manufacturer, I want to emphasize that we design our no-drill honeycomb shades for uPVC windows with the understanding that our customers want flexibility without compromising their window investment. The no-drill methods described in this guide have been tested extensively in our facilities and are approved for use with our window systems.
The most important factor for long-term success is proper installation. A poorly installed tension rod can scratch your window frame. An incorrectly placed adhesive bracket can leave residue. But when installed correctly, these methods cause zero damage and preserve your warranty completely.
We also recommend checking your blind weight against the capacity of your chosen mounting method. Overloading a tension rod or adhesive bracket is the most common cause of failure. When in doubt, choose a method with higher weight capacity than you think you need.
שאלות נפוצות
Will adhesive mounts damage my vinyl window frames when removed?
Quality adhesive mounts using VHB tape can be removed without damage if you use heat to soften the adhesive. Avoid pulling cold adhesive off, as this can lift the vinyl surface. Always test on an inconspicuous area first.
Can I use Command strips to hang blinds on vinyl windows?
Command strips are designed for lightweight items like small frames and hooks. They lack the weight capacity for most blinds and are not recommended. Use purpose-built blind mounting brackets instead.
What is the maximum weight for no-drill blinds on vinyl windows?
Tension rods typically support 5-15 pounds, magnetic brackets support 10-30 pounds, and adhesive brackets support 5-10 pounds. Always check the manufacturer’s specifications for your specific product.
How do I measure for no-drill blinds on vinyl windows?
Measure the inside width at the top, middle, and bottom of your window frame. Use the narrowest measurement. For tension rods, ensure your rod length range covers your measurement. For adhesive or magnetic brackets, measure the available flat surface area.
Can I install blackout blinds without drilling into vinyl?
Yes. Lightweight blackout cellular shades work well with tension rods. For heavier blackout roller shades, magnetic brackets or adhesive mounts with higher weight ratings are recommended.
Will tension rods scratch my vinyl window frames?
Quality tension rods have rubber or silicone ends that prevent scratching. If your rod has hard plastic ends, wrap them with a thin layer of electrical tape for protection.
How do I remove adhesive brackets from vinyl windows?
Use a hair dryer on medium heat for 30-60 seconds to warm the adhesive. Gently pry the bracket away using a plastic putty knife. Remove any residue with rubbing alcohol or citrus cleaner.
Can I use no-drill methods for outside-mount blinds?
Yes. For outside mounts, adhesive brackets or magnetic systems can attach to the wall above the window. Ensure the wall surface is clean and compatible with the adhesive or magnetic system.