When it comes to protecting your home from the brutal summer sun while maintaining your view, solar screens are an excellent investment. But if you have vinyl windows, you’ve probably discovered that installation isn’t quite as straightforward as it is with wood or aluminum frames. Vinyl expands and contracts with temperature changes, it can crack under pressure, and many standard mounting methods simply don’t work well with these modern window frames.
As a manufacturer who has spent years developing mounting solutions specifically for vinyl windows, I’ve seen homeowners make costly mistakes—drilling into frames that crack, using adhesives that fail in the heat, or choosing clips that don’t accommodate the unique profile of vinyl extrusions. This guide covers every viable mounting method available today, with specific attention to what works (and what doesn’t) on vinyl window frames.
Understanding Your Vinyl Window Frame
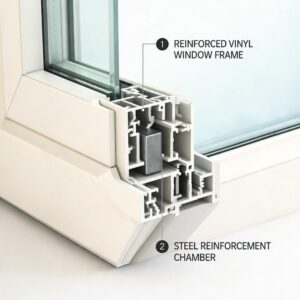
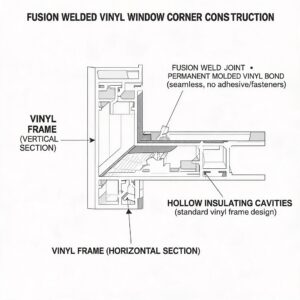
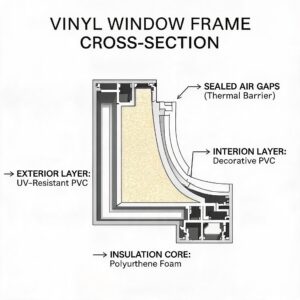
Before we dive into installation methods, it’s important to understand what makes vinyl windows different. Vinyl (PVC/uPVC) frames are hollow extrusions with internal chambers that provide insulation. The surface is smooth and slightly flexible, and the material expands significantly in direct sunlight. This means:
- Drilling requires precision – too much torque and the frame can crack
- Adhesives need heat resistance – standard double-sided tape fails in summer temperatures
- Clips must accommodate movement – rigid mounting can cause frames to warp

Method 1: Casement Clips – The Industry Standard for Vinyl Windows
Casement clips remain the most popular mounting solution for solar screens on vinyl windows, and for good reason. These small metal or plastic brackets clip onto the outer lip of the window frame without requiring any drilling or permanent modification.
How Casement Clips Work
The clip has a hook on one end that grabs the back edge of the window frame’s outer lip, while the front portion receives the solar screen frame. When properly installed, the screen snaps into place and is held securely by tension.
Pros of Casement Clips
- No drilling required – your window frame remains completely intact
- Removable – screens can be taken down for cleaning or seasonal storage
- Works on most vinyl profiles – as long as there’s a visible lip on the frame
- Cost-effective – typically $0.50-$1.50 per clip
Cons of Casement Clips
- Requires adequate lip depth – some modern vinyl windows have very shallow lips that won’t hold clips securely
- Can loosen over time – especially in areas with strong winds or frequent temperature swings
- Not suitable for all window types – casement windows and some slider designs may not accommodate these clips
Installation Tips for Casement Clips on Vinyl
The key to success with casement clips is proper spacing. For standard solar screens, place clips every 12-16 inches along the top and bottom, with additional clips on the sides for larger screens. When installing on vinyl, avoid overtightening any set screws that come with the clip—finger-tight is sufficient.
For homeowners seeking no-drill solar screens for vinyl windows, casement clips are your best starting point. They require zero modifications to your home and can be installed in minutes.
Method 2: Brick Clips – When Your Window Has Masonry Surrounds
Brick clips are designed for a specific scenario: windows set into brick, stone, or concrete walls where there’s no wooden trim to attach to. These clips grip the mortar joint or the brick itself, providing a mounting point for your solar screen frame.
How Brick Clips Work
The clip has a spring-loaded or adjustable jaw that clamps onto the edge of a brick or into a mortar joint. A bracket extends outward to receive the solar screen frame, which then snaps or screws into place.
Pros of Brick Clips
- Excellent for masonry homes – no drilling into brick required
- Very secure – once clamped, these clips don’t move
- Adjustable – many designs allow for fine-tuning the screen position
Cons of Brick Clips
- Requires exposed brick or stone – won’t work on vinyl siding or stucco
- Can damage mortar – if overtightened, clips can crack or crumble old mortar joints
- More expensive – typically $3-$8 per clip
When to Choose Brick Clips Over Casement Clips
If your vinyl windows are set into a brick facade and the window frame itself doesn’t have a sufficient lip for casement clips, brick clips are your solution. They bypass the vinyl entirely and anchor to the masonry structure.
Method 3: Leaf Springs – The Tension-Based Solution
Leaf springs are an elegant solution for vinyl windows that lack a mounting lip. These curved metal springs fit between the solar screen frame and the window frame, using tension to hold everything in place.
How Leaf Springs Work
The spring is compressed and inserted between the screen frame and the window frame. Once released, it expands to create pressure that holds the screen firmly in position. No clips, no adhesives, no drilling.
Pros of Leaf Springs
- Zero hardware visible – the screen appears to float in the window opening
- No frame modification – your vinyl windows remain untouched
- Excellent for shallow frames – works where casement clips cannot grip
- Quick installation – simply compress and insert
Cons of Leaf Springs
- Limited holding power – not suitable for large or heavy screens
- Can slip in extreme heat – vinyl expands, potentially reducing tension
- Difficult to remove – once installed, getting the screen out requires careful manipulation
Best Applications for Leaf Springs
Leaf springs work best on smaller windows (under 3 feet wide) where the screen weight is minimal. They’re particularly effective for basement windows, bathroom windows, and other secondary openings where a full mounting system isn’t justified.
Method 4: 3M Dual Lock – The Industrial Adhesive Option
For homeowners who want a clean, no-hardware look but need something stronger than standard Velcro, 3M Dual Lock is worth considering. This industrial-grade fastening system uses interlocking mushroom-shaped stems that create a much stronger bond than traditional hook-and-loop fasteners.
How 3M Dual Lock Works
One side of the Dual Lock strip adheres to your window frame (using the included 3M adhesive backing), while the other side attaches to your solar screen frame. When pressed together, the stems interlock to create a secure connection that can support significant weight.
Pros of 3M Dual Lock
- No visible hardware – the screen sits flush against the frame
- Strong hold – rated for up to 5 pounds per square inch
- Removable – screens can be taken down for cleaning
- Works on smooth surfaces – ideal for vinyl’s non-porous finish
Cons of 3M Dual Lock
- Adhesive can fail in heat – direct sun exposure weakens the bond over time
- Not suitable for large screens – heavy screens may pull away
- Surface preparation is critical – any dust or oil prevents proper adhesion
- Can leave residue – removal may require adhesive solvent
Making 3M Dual Lock Work on Vinyl Windows
The success of this method depends entirely on surface preparation. Clean the vinyl frame with isopropyl alcohol, allow it to dry completely, and apply the Dual Lock strips at temperatures above 60°F. For best results, use the 3M Primer 94 before applying the adhesive backing.
If you’re specifically looking for no-drill solar screens for vinyl windows, the Dual Lock method offers a clean aesthetic, but be realistic about its limitations for larger installations.
Method 5: Screws Only – When You Need Maximum Security
Sometimes, despite our best efforts to avoid drilling, screws are the most reliable option. Modern vinyl windows can accept screws if done correctly, and this method provides the strongest possible hold for your solar screens.
How to Screw into Vinyl Windows Safely
The key is using the right hardware and technique:
- Use self-tapping screws designed specifically for vinyl or PVC
- Pre-drill pilot holes slightly smaller than the screw diameter
- Don’t overtighten – snug is sufficient; vinyl strips easily
- Avoid the thermal break – most vinyl windows have a metal or foam thermal break in the center of the frame; drilling here compromises insulation
Pros of Screws
- Maximum holding power – your screens will never fall off
- Permanent solution – set it and forget it
- Works on any frame – no special lip or surface required
Cons of Screws
- Permanent modification – you’re putting holes in your window frames
- Risk of cracking – especially in cold weather when vinyl is more brittle
- Potential warranty issues – some window manufacturers void warranties if frames are drilled
- Difficult to reverse – holes need filling if you remove the screens
When Screws Are the Right Choice
Screws are appropriate for large, heavy screens (over 4 feet wide), commercial applications where security is paramount, or situations where all other methods have failed. If you’re installing solar screens on vinyl windows in a rental property, avoid screws unless you have explicit permission from the landlord.
Method 6: Magnetic Mounting – The Emerging Solution
Magnetic solar screens are gaining popularity, particularly for uPVC window frames. This method uses powerful neodymium magnets embedded in the screen frame that attach to metal strips adhered to your window frame.
How Magnetic Mounting Works
Thin steel strips (with adhesive backing) are applied to the window frame. The solar screen frame contains magnets that align with these strips. When brought close, the magnetic attraction holds the screen securely in place.
Pros of Magnetic Mounting
- Extremely easy installation – apply strips, attach screen
- Quick removal – screens come off instantly for cleaning
- No visible hardware – clean, modern appearance
- Works on all frame materials – including vinyl and uPVC
Cons of Magnetic Mounting
- Limited holding strength – strong winds can dislodge screens
- Magnetic interference – can affect electronic devices nearby
- Higher cost – magnets and steel strips add expense
- Temperature sensitivity – magnets lose strength in extreme heat
Best Applications for Magnetic Screens
Magnetic solar screens for uPVC window frames are an excellent choice for ground-floor windows where easy removal is a priority. They’re also ideal for renters who need a completely non-destructive solution. However, for second-story windows or areas with frequent high winds, a more secure mounting method is recommended.
Method 7: Combination Approaches – Hybrid Solutions
In many real-world installations, the best approach combines multiple methods. For example:
- Casement clips on top and sides, with Dual Lock on the bottom – provides security while allowing easy removal
- Screws at corners, clips along edges – maximum strength with minimal hardware
- Leaf springs for small windows, clips for large ones – matching the method to each window’s size
When to Use a Hybrid Approach
If you have a mix of window sizes and frame conditions, don’t feel obligated to use the same method everywhere. A professional installation often uses two or three different mounting techniques across a single home, optimizing each window individually.
Choosing the Right Method for Your Vinyl Windows
Here’s a decision framework based on your specific situation:
| Condition | Recommended Method |
|---|---|
| Vinyl frame with visible lip | Casement clips |
| Vinyl frame with shallow lip | Leaf springs or Dual Lock |
| Brick/masonry surround | Brick clips |
| Rental property (no modifications) | Magnetic or Dual Lock |
| Large, heavy screens | Screws or hybrid approach |
| Extreme wind exposure | Screws or brick clips |
| Maximum aesthetic appeal | Leaf springs or magnetic |
Installation Best Practices for Vinyl Windows
Regardless of which method you choose, follow these guidelines to protect your windows:
Temperature Matters
Install solar screens when temperatures are between 60°F and 80°F. Vinyl expands significantly in heat and contracts in cold. Installing when it’s too hot or too cold can result in screens that fit poorly when temperatures change.
Clean Thoroughly
Use isopropyl alcohol to clean the vinyl surface before applying any adhesive-based mounting system. Even invisible oils from your skin can prevent proper bonding.
Allow for Expansion
Vinyl windows can expand up to 1/4 inch across a 6-foot span on a hot day. Leave a small gap (about 1/8 inch) between the screen frame and the window frame to accommodate this movement.
Test Before Committing
Before drilling holes or applying permanent adhesives, test-fit your mounting hardware. Hold the screen in place, check the alignment, and ensure the method works before making it permanent.
Frequently Asked Questions
Q: Will installing solar screens void my vinyl window warranty?
A: It depends on the manufacturer and the installation method. Non-drilling methods like casement clips or magnetic mounting typically don’t affect warranties. Drilling into the frame almost always voids the warranty, so check your documentation first.
Q: Can I install solar screens on casement windows that open outward?
A: Yes, but you’ll need to use mounting methods that don’t interfere with the window’s operation. Casement clips on the exterior frame work well, as do magnetic systems. Avoid any method that attaches to the moving sash.
Q: How do I clean solar screens without damaging them?
A: Use a soft brush attachment on a vacuum to remove dust, then wash with mild soap and water using a soft sponge. Never use pressure washers or abrasive cleaners, as these can damage the screen mesh.
Q: What’s the lifespan of solar screens on vinyl windows?
A: With proper installation and maintenance, solar screens typically last 5-10 years. The screen mesh may fade or become brittle over time, but the mounting hardware should last much longer.
Q: Can I install solar screens myself, or should I hire a professional?
A: Most homeowners can successfully install solar screens using casement clips or magnetic systems. For screw-mounted or brick clip installations, professional help is recommended if you’re not comfortable with tools or working at heights.
Q: Do solar screens reduce visibility from inside?
A: Solar screens are designed to reduce heat and glare while maintaining outward visibility. During the day, you can see out clearly, but people outside cannot see in. At night, the effect reverses—you’ll need curtains for privacy.
Q: How do I measure my vinyl windows for solar screens?
A: Measure the width and height of the window opening at three points (top, middle, bottom for width; left, center, right for height). Use the smallest measurement to ensure the screen fits. Most manufacturers recommend subtracting 1/4 inch from each dimension for proper clearance.