**How to Repair a Vinyl Window Frame: The Complete Guide for Homeowners**
If you’ve noticed a crack, warp, or gap forming around your vinyl windows, you’re probably wondering whether this is something you can handle yourself or if it’s time to bring in a professional. Vinyl window frames are durable, but they’re not indestructible. Over time, exposure to temperature swings, moisture, and normal wear can lead to damage that compromises both appearance and energy efficiency. This guide walks you through the most common vinyl window frame issues, how to assess the severity, and exactly what steps to take for a lasting repair.
**Understanding Why Vinyl Window Frames Fail**
Before diving into repair techniques, it helps to understand what causes vinyl frames to crack, warp, or separate in the first place. Vinyl is a thermoplastic material, which means it expands and contracts with temperature changes. In regions like Pittsburgh, where freeze-thaw cycles are common, this constant movement puts stress on the frame joints and corners.
The most frequent culprits include:
– **Thermal stress** – Extreme cold followed by direct sunlight can cause the vinyl to expand unevenly, leading to hairline cracks near the corners.
– **Impact damage** – A stray baseball, falling branch, or even a heavy storm can create visible cracks or chips.
– **Improper installation** – Frames that were not properly shimmed or secured during installation may shift over time, causing gaps and misalignment.
– **Age-related degradation** – Vinyl becomes more brittle after 15 to 20 years, especially if it has been exposed to UV radiation without adequate protection.
Knowing the cause helps you decide whether a simple patch will hold or if the frame needs more extensive work.
**Assessing the Damage: Repair or Replace?**
Not every crack or warp requires a full window replacement. In fact, many common issues can be resolved with basic tools and a little patience. The key is knowing when a repair is structurally sound and when it’s merely a temporary fix that will fail within months.
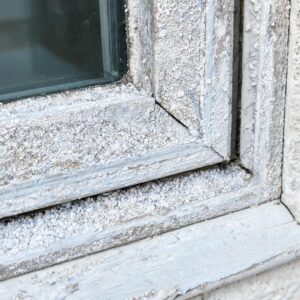
**Small cracks under six inches** that are not located at the welded corner joints can usually be repaired with a vinyl patching compound or a DIY vinyl window corner weld repair kit. These kits are designed to bond with the existing vinyl and restore the frame’s integrity without the need for professional tools.
**Warped frames** that have bowed inward or outward may be salvageable if the distortion is less than a quarter-inch. Anything beyond that suggests the frame has lost its structural memory, and a replacement section or full frame swap is the better long-term solution.
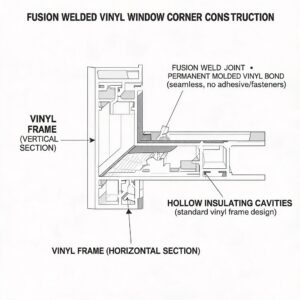
**Separated corner welds** are a different matter. Vinyl window frames are fusion-welded at the corners during manufacturing. If a weld has failed, the frame will likely continue to separate over time. In this case, a professional repair or replacement is almost always necessary.
**Tools and Materials You Will Need**
If you’ve decided to proceed with a DIY repair, gather the following items before you begin. Having everything on hand will make the process smoother and reduce the risk of mistakes.
– Vinyl patching compound or two-part epoxy designed for exterior use
– Fine-grit sandpaper (220 grit works well)
– Clean, lint-free cloth
– Isopropyl alcohol or acetone for cleaning
– Putty knife or plastic spreader
– Painter’s tape
– Heat gun or hair dryer (for warped frames)
– Shims (for realigning frames)
– Safety glasses and work gloves
For corner weld repairs, you will need the specific kit recommended by the window manufacturer. Generic adhesives rarely bond well to the factory-finished vinyl surface.
**Step-by-Step Guide: How to Fix a Cracked Vinyl Window Frame**
This process works for surface cracks, small chips, and hairline fractures that have not compromised the frame’s structural integrity.
**Step 1: Clean the damaged area thoroughly.** Use a cloth dampened with isopropyl alcohol to remove dirt, grease, and any loose debris. Let the area dry completely. Any residue left behind will prevent the patching compound from adhering properly.
**Step 2: Sand the edges of the crack lightly.** Use fine-grit sandpaper to smooth any rough edges and create a slightly textured surface for the compound to grip. Wipe away the dust with a clean cloth.
**Step 3: Apply painter’s tape around the crack.** This protects the surrounding frame from accidental smearing and helps you achieve a clean repair line.
**Step 4: Mix and apply the patching compound.** Follow the manufacturer’s instructions carefully. Most two-part epoxies require thorough mixing for at least 60 seconds. Use a putty knife to press the compound firmly into the crack, slightly overfilling it to account for shrinkage.
**Step 5: Smooth the surface.** Before the compound sets, run the putty knife across the repair to level it with the surrounding frame. Remove the painter’s tape while the compound is still soft.
**Step 6: Let it cure.** Allow the compound to cure for the time specified on the package, usually 24 hours. Avoid opening or closing the window during this period.
**Step 7: Sand and finish.** Once cured, lightly sand the repair area until it is flush with the frame. If desired, you can apply a matching exterior-grade paint or vinyl touch-up coating to blend the repair.

**Dealing with Warped Vinyl Window Frames**
Warping is a different challenge because it involves the frame’s shape rather than a surface defect. Warping usually occurs when the frame has been subjected to prolonged heat or moisture exposure, causing the vinyl to soften and deform.
For minor warping, you can try a heat-based realignment technique. Use a heat gun set to low or a hair dryer on high to warm the warped section evenly. Do not concentrate the heat in one spot, as this can cause the vinyl to blister. Once the material becomes pliable, gently press it back into its original position using a block of wood or a flat tool. Hold it in place until it cools and retains the corrected shape.
If the warp is more pronounced, you may need to insert shims between the frame and the wall to push it back into alignment. Insert the shims gradually, checking the frame’s position frequently. Over-shimming can crack the frame or damage the drywall.
Keep in mind that warping often indicates an underlying issue, such as poor drainage or excessive moisture behind the frame. Addressing the root cause is essential to prevent the problem from recurring.
**When Professional Help Is the Smarter Choice**
There are situations where a DIY approach simply won’t deliver lasting results. Recognizing these scenarios early can save you time, money, and frustration.
**Failed corner welds** are the most common reason to call a professional. If the welded joint has separated, the frame’s structural integrity is compromised. Patching the gap with adhesive may hold for a few months, but the joint will likely fail again under normal thermal movement.
**Extensive cracking** that runs through multiple sides of the frame or extends into the glazing channel is another red flag. In these cases, the frame has lost its ability to hold the glass securely, which creates a safety hazard and a significant energy efficiency loss.
**Water infiltration** behind the frame is a serious issue that often goes unnoticed. If you see signs of moisture, mold, or rot around the window opening, the damage may extend beyond the vinyl frame to the surrounding wall structure. A professional inspection can determine whether the frame can be repaired or if a full replacement is necessary.
**Older windows** that are approaching 20 years of age may not be worth repairing. Even if you fix the visible damage, the seals, hardware, and insulation are likely nearing the end of their service life. Investing in replacement windows often provides better long-term value.
**Preventing Future Frame Damage**
Once you’ve completed your repair, taking a few preventive steps can extend the life of your vinyl windows significantly.
– **Keep the tracks clean.** Dirt and debris in the window tracks can cause the sash to bind, putting stress on the frame. Clean the tracks twice a year with a soft brush and mild detergent.
– **Check the weatherstripping.** Worn or missing weatherstripping allows moisture to seep into the frame joints, accelerating deterioration. Replace it as needed.
– **Maintain proper drainage.** Ensure that the weep holes at the bottom of the frame are clear. Blocked weep holes can cause water to pool inside the frame, leading to warping and rot.
– **Apply UV protectant.** A vinyl-safe UV protectant spray can help prevent the material from becoming brittle due to sun exposure. Apply it annually, especially on south- and west-facing windows.
**Frequently Asked Questions**
**Can I use regular epoxy to repair a vinyl window frame?**
Standard epoxy may not bond well to vinyl because the material’s low surface energy resists adhesion. It is better to use a product specifically formulated for vinyl or PVC. These compounds contain additives that promote bonding and flexibility.
**How long does a vinyl window frame repair typically last?**
A properly executed repair on a small crack can last several years. However, repairs on frames that are already showing signs of age or thermal stress may have a shorter lifespan. Expect 2 to 5 years for most DIY repairs, depending on the severity of the damage and local climate conditions.
**Is it safe to use a heat gun on vinyl window frames?**
Yes, but with caution. Use the lowest heat setting and keep the gun moving constantly to avoid overheating any single spot. Vinyl can blister or melt if exposed to excessive heat. A hair dryer is a safer alternative for minor warping.
**What is the average cost of professional vinyl window frame repair?**
Professional repair costs vary widely based on the extent of the damage and your location. In most markets, you can expect to pay between $150 and $400 for a single frame repair. This is significantly less than the cost of a full window replacement, which typically ranges from $500 to $1,200 per window.
**Should I replace the entire window if the frame is cracked?**
Not necessarily. If the crack is small and located away from the welded corners, a repair is often sufficient. However, if the window is older than 15 years or the crack is accompanied by fogging between the glass panes, replacement is usually the better investment.
**Can a warped vinyl window frame be straightened permanently?**
Minor warping can often be corrected using heat and shims, but the fix may not be permanent if the underlying cause is not addressed. If the warp returns within a few months, the frame has likely lost its structural integrity and replacement is recommended.
**Do I need to remove the window sash to repair the frame?**
For most surface repairs, you can work with the sash in place. However, if you are repairing a corner weld or addressing a warp near the sash channel, removing the sash will give you better access and prevent accidental damage to the glass.
By taking the time to properly assess your vinyl window frame damage and choosing the right repair approach, you can restore both function and appearance without unnecessary expense. Whether you decide to tackle the job yourself or bring in a professional, understanding the process puts you in control of the outcome.